Showing posts with label K8S. Show all posts

Wednesday, May 27, 2026

K8sGPT

May 27, 2026 0


K8sGPT is a tool for scanning your Kubernetes clusters, diagnosing and triaging issues in simple english. It has SRE experience codified into its analyzers and helps to pull out the most relevant information to enrich it with AI.

K8SGPT is an advance AI algorithm analysis your cluster state and provide intelligent inside for troubleshooting.  

CNAI - Cloud native along with AI. Kubeflow is a best example of CNAI.
AICN - Artificial Intelligent with Cloud native. K8SGPT is a best example of AICN.
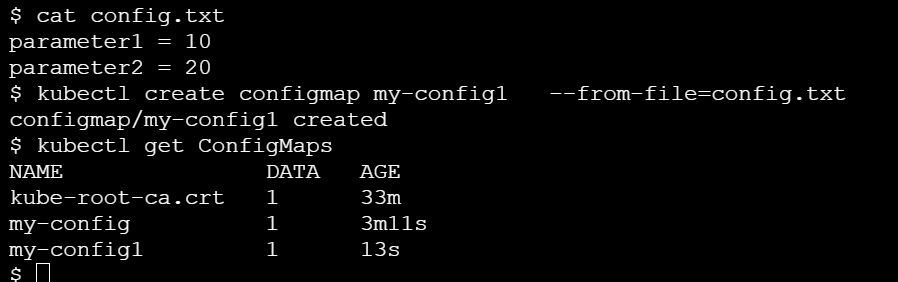
WorkFlow:


Saturday, April 4, 2026

Deep Dive of Kubernetes Network

April 04, 2026 0


K8S is a dynamic network. Pods are ephemeral.  IP change on every restart.

Containers with in the pod shared a single network namespace.

K8S networking Model:

1) Every Pod receive a unique and cluster wide IP address.

2) All pods on the same node can communicate directly without NAT

3) All pods on different nods can communicate directly without NAT

4) A Pod self seen IP is identical to the IP other pods use to reach it [Flat network]

Kubernetes specifies what is required and CNI plugins decide How to implement it

Communication pattern in K8S

Container to Container - within same pod via loopbackup [127.0.0.1]

Pod to Pod - Direct IP communication across nodes without address translation

Pod to Service - Kube proxy intercepts traffic and load balancing to healthy end points

External to Service - Exposed via NodePort, LoadBalance type or Ingress controller

Node to Pod - Kubelet and monitoring agents


Kube-Proxy:
Kube proxy runs on every node as a DaemonSet and part of the Kubernetes control plane. It watches API sever for any change of resource or end points. API server initate a end point object when selector create a resourece.  Kube proxy is maintaining a chain of IP table mode. I used to maintain local and forward routing.  IPVS is a kernel level virutal load balancer. It will handle thousand of service request and routing at a same time.
Pod to service will take care of kube proxy and pod to pod communication will take care of CNI.
CoreDNS:
CoreDNS is the cluster DNS server and deployed as a deployment in the kube system namespace.Every pod of /etc/resolv.conf is inject to point into CoreDNS.
Pod Networking:
Each pod has an Own network namespace and fully isolated stack. The namespace contain virutal vNICs, routing table and iptable rules.

Infra [pause] container creates and own a network namespace for the pod. All application containers in the Pod share the Infra container namespace at startup.

Virtual [veth] pair : Two virtual NICs connect between Pod and Node side. One end lives inside the Pod's network namespace [eth0] and other end is attached to Node like linux bridge [cbr0]

Traffic flow : Pod [eth0] -> veth pair -> host bridge -> node routing table -> destination 

Cross Node communication:
Node to Node communication is used Overlay approach and Underlay approach.
Overlay approach is encapsulated a traffic and decapsulated from destionation node.
Underlay approach is a direct routing method.
Modern CNIs like calico & cilium will support both approach.
Overlay (VxLAN/Geneve) - It is universal compatibility and cloud friendly. It will support upto 50 bytes per packet if MTU set to 1450
Underlay - It required physical network to accept and route through BGP routing

Analysis a packet flow under flannel CNI.

controlplane:~$ kubectl get pods -n kube-flannel -o wide

NAME                    READY   STATUS    RESTARTS   AGE   IP            NODE           NOMINATED NODE   READINESS GATES

kube-flannel-ds-5sv5v   1/1     Running   0          15m    controlplane   <none>           <none>

kube-flannel-ds-n7dxx   1/1     Running   0          15m     node01         <none>           <none>

controlplane:~$ 

node01:~$ tcpdump -i flannel.1 -n 'tcp' -vvv

tcpdump: listening on flannel.1, link-type EN10MB (Ethernet), snapshot length 262144 bytes

^C

0 packets captured

0 packets received by filter

0 packets dropped by kernel

node01:~$ 

Service:

K8S will face very difficult to manage an IP address across PODs. This issue will fix by service which providing an stable virtual IP (Cluster IP). It will act as a load balancer across all the pods. It will enable a loose coupling within application.

Service components:

Selector : Determines which pods belongs to this service
Cluster IP: Virtual IP assigned by K8S
Port: The port of the service listens on
TargetPort: The port on the container that the service forwards traffic to
Endpoints: The actual pod IPs and ports maintained by the endpoint controller
Metadata: Name, namespace, and labels for the identification and discovery
DNS Service:
CoreDNS will create a DNS record for service by automatically
FQDN format: <Service name>.<namespace>.svc.cluster.local
Short names: same namespace can be used as <servicename>
Search Domains: Kubernetes injects search paths for automatic resolution
A Records : Return the ClusterIP for standard Service lookup
SRV Records: For advanced applications needing protocol and port information
Kube-Proxy:
It is running as DameonSet on every Node and responsible for Service networking
Use Linux Kernel iptables rules for packet filtering and NAT
CoreDNS Configuration:
ConfigMap-based : All configuration in /etc/coredns/Corefile ConfigMap
plugins : Support for various plugins [K8S, etcd, forward]
Zone Configuration : Define which domains Core DNS manages
Upstream DS : can forward unknown queries to external DNS servers
Caching : Caches DNS responses to reduce latency and load
Logging : Can enable query logging for troubleshooting
Common issues related to Services:
Service is not reachable - We need to verify the selector label should match with Pod labels.
Some Pods are not receiving traffic - Validate the pod readiness status and liveness probes.
DNS is not resolving - We need to validate the CoreDNS in kube-system namespace
High Latency - Validate the kube-proxy mode, It may be iptables overhead
Uneven load distribution : Check pod resources and scheduling across nodes
Service IP not allocated : Verify Cluster IP range configured and available
Deployment Methods:
Multi tier applications : Cluster IP for backend and LoadBalancer for frontend
Hybrid deployments: Database might be deployed in cloud and services were deployed in Local
Blue-Green deployment : The customer has 2 types of setups for Prod, They will tested in standby before applied in active production environment.
Canary Deployments : They will segregate a loads through LoadBalancer and send 10% of loads into latest deployment.
Service Mesh Integration : Using Services as foundation for advanced networking
Multi-cluster : Services can be federated across multiple clusters.
Created service with Cluster IP for Web application:
ontrolplane:~$ kubectl get pods -o wide
NAME                   READY   STATUS    RESTARTS   AGE   IP           NODE     NOMINATED NODE   READINESS GATES
web-64c966cf88-45528   1/1     Running   0          20s   10.244.1.5   node01   <none>           <none>
web-64c966cf88-4x8xq   1/1     Running   0          20s   10.244.1.4   node01   <none>           <none>
web-64c966cf88-n66tm   1/1     Running   0          20s   10.244.1.3   node01   <none>           <none>
controlplane:~$ kubectl expose depolyment web --name=web-service --t^C
controlplane:~$ kubectl expose deployment web --name=web-service --type=ClusterIP --port=80 --target-port=80
service/web-service exposed
controlplane:~$ kubectl describe service web-service
Name:                     web-service
Namespace:                default
Labels:                   app=web
Annotations:              <none>
Selector:                 app=web
Type:                     ClusterIP
IP Family Policy:         SingleStack
IP Families:              IPv4
IP:                       10.97.253.216
IPs:                      10.97.253.216
Port:                     <unset>  80/TCP
TargetPort:               80/TCP
Endpoints:                10.244.1.3:80,10.244.1.4:80,10.244.1.5:80
Session Affinity:         None
Internal Traffic Policy:  Cluster
Events:                   <none>
Created a test CoreDNS service and validate with Cluster IP address of Web application:
ontrolplane:~$ kubectl run -it --image=nicolaka/netshoot --restart=Never test-dns -- sh
All commands and output from this session will be recorded in container logs, including credentials and sensitive information passed through the command prompt.
If you don't see a command prompt, try pressing enter.
~ # nslookup web-service
;; Got recursion not available from 10.96.0.10
Server:         10.96.0.10
Address:        10.96.0.10#53

Name:   web-service.default.svc.cluster.local
Address: 10.97.253.216
;; Got recursion not available from 10.96.0.10
Ingress and Ingress Controller:
Ingress controller continuously monitor the Kubernetes API for Ingress, Service and Secret changes.
Configuration Generation : Controller will generate a configuration for underlying of Load Balancer  if detect any changes in API and.
Configuration Push : Updated configuration is applied to the actual load balancer or reverse proxy daemon.
Health Checks: Controllers verify backend services are healthy and update routing accordingly
Event-Driven: Entire process is asynchronous and event driven.
Backward Compatibility : Controller will ensure that exist traffic is not disrupted during configuration changes.
NGINX Ingress Controller:
* Most widely adopted controller in production and maintained by the community and NGINX.
* NGINX open source reverse proxy as the underlying HTTP/HTTPS server
* Rich Feature Set: Rate limiting, request/response rewriting, WAF integration, mutual TLS, JWT validation
Traefik - Modern & Cloud Native Option
* It is build for Kubernetes and microservice. It doesn't require service reboot while ingress configure changes.
* Buit-in Web UI and REST API for monitoring and management
* Powerful middleware chain for request transformation
* Lower memory and CPU consume compare to NGINX.
Other Popular Ingress Controller:
AWS ALB Controller : Provision AWS application Load Balancers directly, native AWS integration.
GCP Load Balancing : Google Cloud's integrated solution with advanced routing and DDoS protection
Azure App Gateway:  Microsoft managed ingress solution with WAF and SSL offloading
Istio Ingress Gateway: Service mesh approach, combines ingress with advanced traffic management and security policies
Cilium Ingress Controller: eBPF based controller, ultra high performance and advanced networking features.
Configure TLS in Ingress resources:
TLS Block Structure : Specify hosts, Secret Name and optional Paths.
tls:
- hosts:
    - api.test.com
    - web.test.com
  secretName: my-tls-secret
Secret Format: Kubernetes TLS secrets contain tls.cert and tls.key [private key] as base64 encoded data
Hostname Matching: TLS certificate hostname must match the Ingress host specification, mismatches cause browser warning.
Wildcard Certificate : Support *.test.com to serve multiple subdomains with single certificate
Mixed protocol : It can serve simultaneously for HTTP and HTTPS.
Controller Specific : Different controllers may support additional TLS features vis annotations
Advanced Routing Patterns:
Header based routing : Route based on HTTP headers controller
Query parameter Routing : Some controllers support routing based on query parameters
Weight Based Routing - Distribute traffic percentage wise across multiple backends
Request Transformation : Add/modify headers, append/strip paths before sending to backend services
Rate Limiting : Limit request per IP, hostname or custom key
Authentication/Authorization : Some controllers will support JWT validation, OAuth flows or mutual TLS verification at ingress.
Gateway API:
K8S is having limited Ingress by design. Gateway API will use to over limit of Ingress. It has a three Layers. 1) GatewayClass (controller implementation) 2) Gateway (listener and security config) 3) HTTPRoute (routing rules)
HTTPRoute is similar to Ingress rules but more flexible and reusable across multiple Gateways.
Create an Ingress controller:
controlplane:~$ kubectl create namespace ingress-ngnix
namespace/ingress-ngnix created
controlplane:~$ kubectl apply -f https://raw.githubusercontent.com/kubernetes/ingress-nginx/controller-v1.8.1/deploy/static/provider/baremetal/deploy.yaml
namespace/ingress-nginx created
serviceaccount/ingress-nginx created
serviceaccount/ingress-nginx-admission created
role.rbac.authorization.k8s.io/ingress-nginx created
role.rbac.authorization.k8s.io/ingress-nginx-admission created
clusterrole.rbac.authorization.k8s.io/ingress-nginx created
clusterrole.rbac.authorization.k8s.io/ingress-nginx-admission created
rolebinding.rbac.authorization.k8s.io/ingress-nginx created
rolebinding.rbac.authorization.k8s.io/ingress-nginx-admission created
clusterrolebinding.rbac.authorization.k8s.io/ingress-nginx created
clusterrolebinding.rbac.authorization.k8s.io/ingress-nginx-admission created
configmap/ingress-nginx-controller created
service/ingress-nginx-controller created
service/ingress-nginx-controller-admission created
deployment.apps/ingress-nginx-controller created
job.batch/ingress-nginx-admission-create created
job.batch/ingress-nginx-admission-patch created
ingressclass.networking.k8s.io/nginx created
validatingwebhookconfiguration.admissionregistration.k8s.io/ingress-nginx-admission created

controlplane:~$ kubectl get pods -n ingress-nginx
NAME                                        READY   STATUS      RESTARTS   AGE
ingress-nginx-admission-create-wjmb8        0/1     Completed   0          29s
ingress-nginx-admission-patch-nvst7         0/1     Completed   0          29s
ingress-nginx-controller-5c5949d455-8zn8s   1/1     Running     0          29s
controlplane:~$ kubectl get svc -n ingress-nginx
NAME                                 TYPE        CLUSTER-IP       EXTERNAL-IP   PORT(S)                      AGE
ingress-nginx-controller             NodePort    10.110.76.184    <none>        80:30384/TCP,443:32500/TCP   61s
ingress-nginx-controller-admission   ClusterIP   10.105.205.149   <none>        443/TCP                      61s
controlplane:~$ kubectl create deployment nginx-app --image=nginx --replicas=2 -n test
error: failed to create deployment: namespaces "test" not found
controlplane:~$ kubectl create ns test
namespace/test created
controlplane:~$ kubectl create deployment nginx-app --image=nginx --replicas=2 -n test
deployment.apps/nginx-app created
controlplane:~$ kubectl expose deployment nginx-app --name=nginx-service --port=80 --target-port=80 -n test
service/nginx-service exposed
controlplane:~$ kubectl get pods -n test
NAME                         READY   STATUS    RESTARTS   AGE
nginx-app-766796df68-826f9   1/1     Running   0          56s
nginx-app-766796df68-ggz4p   1/1     Running   0          56s
controlplane:~$ kubectl get svc -n test
NAME            TYPE        CLUSTER-IP      EXTERNAL-IP   PORT(S)   AGE
nginx-service   ClusterIP   10.97.195.253   <none>        80/TCP    52s
controlplane:~$ kubectl get svc -n test -o wide
NAME            TYPE        CLUSTER-IP      EXTERNAL-IP   PORT(S)   AGE     SELECTOR
nginx-service   ClusterIP   10.97.195.253   <none>        80/TCP    2m43s   app=nginx-app
controlplane:~$ 

controlplane:~$ kubectl apply -f ingress-host-based.yaml 
ingress.networking.k8s.io/host-based-ingress created
controlplane:~$ kubectl get ingress -n test
NAME                 CLASS   HOSTS         ADDRESS       PORTS   AGE
host-based-ingress   nginx   nginx.local   172.16.20.6   80      33s
controlplane:~$ kubectl describe ingress host-based-ingress -n test
Name:             host-based-ingress
Labels:           <none>
Namespace:        test
Address:          
Ingress Class:    nginx
Default backend:  <default>
Rules:
  Host         Path  Backends
  ----         ----  --------
  nginx.local  
               /   nginx-service:80 (10.244.1.6:80,10.244.1.7:80)
Annotations:   <none>
Events:
  Type    Reason  Age                From                      Message
  ----    ------  ----               ----                      -------
  Normal  Sync    67s (x2 over 67s)  nginx-ingress-controller  Scheduled for sync
  Normal  Sync    10s                nginx-ingress-controller  Scheduled for sync
controlplane:~$ 
Network Policy:
K8S API objects that act as Layer 3/4 firewalls and controlling pod-to-pod and pod-to-external communication.
Security Model: It will deny by default, we can define explicitly allow what's needed.
Container Network Interface (CNI) : K8S delegates network implementation to CNI plugins.
It will act as OR operation if multiple entries. It will allow traffic to any matching destination is allowed simultaneously.
Microservice Policy:
3 Tier Architecture : Web (frontend), API (backend), Database (persistent layer)
Traffic Flow: Client -> web:80, Web -> API:8080, API -> Database:5432
Policy Layer 1:  Web pods have egress to API pods on port 8080, deny all other egress exceptDNS
Policy Layer 2: API pods have ingress from web pods on 8080 and egress to Database pods on 5432 and deny all else.
Policy Layer 3: Database pods have ingress from API pods on 5432 only and never initiates outbound
Debugging of Network policy:
  • Connection Timeout/ Refused : Check if a policy is selecting the pod and list polices in the namepsace.
  • List policy - kubect get networkpolicy -n namespace | grep pod-label
  • Describe policy - kubectl describe networkpolicy name -n namepsace
  • check pod labels : kubectl get pods -n namespace --show-labels
  • Test connectivity : kubectl exec source-pod -- curl destination-pod:port -v
  • Check for DNS issues - If application cannot resolve hostnames, policy may missing egress of that host.
  • CNI logs: kubectl logs -n kube-system calico-node/cilium-agent | grep DENIED

Tuesday, March 10, 2026

Infrastructure as Code through AI workloads

March 10, 2026 0


A Kubernetes operator is a specialized controller designed to extend Kubernetes API, enabling the management of complex application through declarative configurations.
Kubernetes Operator operate within continuous reconciliation loop. This cycle begins when user create a resource, It prompting controller to monitoring a change and take a necessary action to ensure a desire state. Operator allow user to defined a desired state of application in custom resources, while operator
controller continue reconcile the actual state with this desire state, embodying the operational expertise of human site reliability engineer.
KubeFlow : It is a primary of orchestration tool for MI workflow. It is focus on training aspect of models.

Most using of Kubernetes resources in the real time.
APIService
ClusterRole
ClusterRoldBinding
ConfigMap
CronJob
CSIDriver
CSINode
DaemonSet
Deployment
EphemeralContainers
HorizontalPodAutoscalar
Ingress
IngressClass
Job
Namespace
Node
PersistVolume
Pod
PodDisruptionBudget
PodTemplate
ReplicatSet
ResourceQuota
Role
RoleBinding
Secret
Service
ServiceAccount
StatefulSet
StorageClass
VolumeAttachment
Binding
CertificateSigningRequest
ComponentStatus
ControllerRevision
CustomResourceDef
Endpoints
EndpointSlice
LeaseReplicationController
LimitRange
LocalSubjectAccess
MutatingWebhookConfiguration
NetworkPolicy
PodSecurityPolicy
PriorityClass
RuntimeClass
SelfSubjectAccess
SelfSubjectRules
SubjectAccessReview
TokenReview
ValidatingWebhook


Monday, March 3, 2025

Datadog Introduction

March 03, 2025 0


Datadog Monitoring Tool:
    Observability is essential for managing modern infrastructure and applications. It brings together real-time metrics from servers, containers, databases, and applications. It achieves this with end-to-end tracing. That’s not all that it can do. It comes up with helpful alerts and fascinating visualizations, offering full-stack observability.

Observability of three metrics [Rate, errors and duration] provide a well rounded view of service performance.
Rate : Monitoring a HTTP and API calls of your services
We will get to know the service over load for monitoring the HTTP and API calls. We will take action if any spikes or sudden drops in the rate of requests. It could indicate issues such as sudden traffic surges, DDos attacks or failures in the upstream.
Errors: Track how many of those request fail.
The error could be server error, database error or failed API calls. We can quickly identify issues with our application or backend system while tracking these errors.
Duration: Measure how long those requests take with latency
High latency will degrade a user experience particularly for real time or interactive applications. Monitoring of duration will allow us to detect a performance bottlenecks before they affect our users.

Below are few of the Datadog monitoring types and we can create and use it.

APM: Monitor application performance monitoring (APM) metrics or trace queries.
Metric: Compare values of a metric with a user-defined threshold.
Logs: Alert when a specified type of log exceeds a user-defined threshold over a given period of time.
Database Monitoring: Monitor query execution and explain plan data gathered by Datadog.
Error Tracking: Monitor issues in your applications gathered by Datadog.
Real User Monitoring: Observe user behavior and monitor frontend performance.
Synthetic Monitoring: Simulate user actions to test API endpoints or website functionality.
Anomaly: Detect anomalous behavior for a metric based on historical data.
Cloud Network Monitoring: Monitor cloud-specific network configurations and traffic.

Infrastructure Monitoring: 
Datadog can monitor the performance and health check of our entire infrastructure. This includes servers, containers, databases, and cloud services. It provides:
  • Metrics collection
  • Visualizations and dashboards
  • Alerting
  • Anomaly [behaves differently than usual] monitoring
  • Infrastructure maps
  • Logs and traces integration
  • Automation
Application Performance Monitoring (APM)
Datadog offers APM functionality to monitor and optimize the performance of your applications. It provides detailed visibility into application code, dependencies, and performance bottlenecks. With it, you can track response times, error rates, and throughput. What’s more, you can gain visibility into the performance of individual requests.

Distributed Tracing
Distributed tracing, Datadog allows teams to trace requests as they flow through your complex, distributed systems. It helps you to:
  • Identify latency issues
  • Understand dependencies between services
  • Troubleshoot performance problems across microservices architectures
  • You can see how you can easily identify the root causes of application performance issues. It collects data moving between services.
Log Management
Datadog enables centralized log management. This allows you to collect, index, search, and analyses logs from various sources. You can aggregate Datadog logs from multiple systems and applications. You can set up alerts based on log events. Also, you can collect the customized logs from the servers.
Real-time Metrics and Dashboards
 Datadog provides real-time metrics and customizable dashboards. A Datadog dashboard helps to visualize and monitor the health and performance of our systems. You can create visualizations, charts, and graphs to:
  • Track key metrics
  • Set up alerts based on thresholds
  • Share dashboards with your team
Collaboration and Notifications
Datadog offers collaboration features that allows teams to work together effectively. You can annotate and share graphs, dashboards, and alerts. You can even set up notifications via email, SMS, or third-party integrations. Want to integrate incident management tools like Slack, Jira, and PagerDuty? No problem. You can even collaborate on troubleshooting and resolving issues.
Integration and Extensibility
Datadog integrates with a wide range of tools and services. As you can imagine, this makes it easy to collect data from various sources. You can integrate Datadog with all the popular cloud platforms. Don’t stop there, you can integrate it with all your existing workflows.

Thursday, November 21, 2024

Deployment Strategies in Kubernetes

November 21, 2024 0


                             Deployment Strategies in Kubernetes

Kubernetes is a powerful container orchestration tool that simplifies the management of containerized applications. It handles provision, deployment, resource allocation, load balancing and Service discovery.

Kubernetes deployments are essentially just a wrapper around ReplicaSets. The ReplicaSet manages the number of running pods, and the Deployment implements features on top of that to allow rolling updates, health checks on pods, and easy roll-back of updates. During normal operations, the Deployment will just manage a single ReplicaSet which ensures that desired number of pods are running: When using Deployments, you should not directly manage the ReplicaSet that is created by the Deployment. All operations that you would perform on a ReplicaSet should be performed on the Deployment instead, which then manages the process for updating the ReplicaSet. 

Deployment strategies:

Rolling update Deployment : It will replace a old version of pod with new version one by one and reduce the downtime.

Recreate Deployment: It will bring down the old version and scale up with new version. It will require a downtime to perform this deployment.

Blue Green Deployment: It keeps one version alive while testing a new version and reduce a downtime/risk.

Canery Deployment: It allows gradual users to perform a testing with new version with subset of users before full rollout.


Few  Roll updates commend examples in the K8S.


The most important option to configure rolling updates is the update strategy. In your 
Deployment manifest, spec.strategy.type has two possible values:

• RollingUpdate: New pods are added gradually, and old pods are terminated gradually
• Recreate: All old pods are terminated before any new pods are added.


Monday, September 2, 2024

Kubernetes - Role based access control [Part 11]

September 02, 2024 0


Every request to Kubernetes is first authenticated, Authentication provides the identity of the caller issuing the request.  It could integrate deeply with pluggable authentication provide like Azure Active Directory to establish an identity within third party system.

Once user have been authenticated, the authorization phase determines whether they are authorized to perform the request. Authorization is a combination of identify the user and the resource and verb or action that user is trying to perform it.

Kubernetes makes distinction between user identity and service account identity. The service account identity is managed by K8S inside the cluster where as user identity is a normal user who is try to access the resource from outside of the K8S.

Kubernetes is supporting number of different authentication providers such as:

* HTTP based authentication provider 
* Static token file on the host
* Cloud authentication provider such as AWS Identity and access management & Azure active Directory
* Authentication Webhooks.

Kubernetes there are 2 pairs of role and role binding.

  • The first one  is applied in the name space level
  • The second one is applied through cluster level
The Yaml configuration file for the role binding:

kind: Role
apiVersion: rbac.authorization.k8s.io/v1
metadata:
  namespace: default
  name: pod-and-services
rules:
- apiGroups: [""]
  resources: ["pods", "services"]
  verbs: ["create", "delete", "get", "list", "patch", "update", "watch"]


Sunday, September 1, 2024

Kubernetes - ConfigMaps and Secrets [Part 10]

September 01, 2024 0


ConfigMaps are used to provide the configuration information for the workloads.  This can either be fine-grained string format or file format.

Secrets: It is similar like ConfigMaps but it will provide the sensitive information into workloads.

Created a ConfigMaps file:


ConfigMaps can be mount as file system in the Pod and passing a environmental variables or passing a ConfigMaps through command line from the K8S.

Created a Yaml file for mounting the ConfigMaps as file system inside of the pod.

apiVersion: v1
kind: Pod
metadata:
  name: kuard-config
spec:
  containers:
    - name: test-container
      image: gcr.io/kuar-demo/kuard-amd64:blue
      imagePullPolicy: Always
      command:
        - "/kuard"
        - "$(EXTRA_PARAM)"
      env:
        - name: ANOTHER_PARAM
          valueFrom:
            configMapKeyRef:
              name: my-config
              key: another-param
        - name: EXTRA_PARAM
          valueFrom:
            configMapKeyRef:
              name: my-config
              key: extra-param
      volumeMounts:
        - name: config-volume
          mountPath: /config
  volumes:
    - name: config-volume
      configMap:
        name: my-config
  restartPolicy: Never

Secrets:

Secrets used to managing passwords, security tokens, other type of private keys.  Secrets are exposed to Pods via explicit declaration in the Pod manifests and Kubernetes API. Secrets are stored in the tmpfs file system [RAM disk].

Defined the Secrets inside the Pod configuration:

apiVersion: v1
kind: Pod
metadata:
  name: kuard-tls
spec:
  containers:
    - name: kuard-tls
      image: gcr.io/kuar-demo/kuard-amd64:blue
      imagePullPolicy: Always
      volumeMounts:
      - name: tls-certs
        mountPath: "/tls"
        readOnly: true
  volumes:
    - name: tls-certs
      secret:
        secretName: kuard-tls

Created a secrets for the docker pull registry:

# kubectl create secret docker-registry my-image-pull-secret --docker-username=<username> --docker-password=<password> --docker-email=<email-address>

Updating the ConfigMap or Secrets file:

#kubectl replace -f filename

(or)

Edit the configuration file through command line

$ kubectl edit configmap my-config


Kubernetes - Deployment [Part 9]

September 01, 2024 0


TDeployments are declarative objects that described the deployed application. The Deployment object exists to manage the release of new version of the applications. We can simply to rollout or rollback without downtime through deployment.

The Yaml file for the deployment:

apiVersion: extensions/v1beta1
kind: Deployment
metadata:
  name: kuard
spec:
  selector:
    matchLabels:
      run: kuard
  replicas: 1
  template:
    metadata:
      labels:
        run: kuard
    spec:
      containers:
      - name: kuard
        image: gcr.io/kuar-demo/kuard-amd64:blue

The ReplicaSet is managing the Pods and Deployment is managing the ReplicaSet.

We can get know the ReplicaSet and desire status from the Deployment.

#kubectl get deployments deploymentname -o jsonpath --template {.spec.selector.matchLabels}

Example:

$ kubectl get deployments kuard -o jsonpath --template {.spec.selector.matchLabels}
map[run:kuard]

$ kubectl get replicasets --selector=run=kuard
NAME              DESIRED   CURRENT   READY     AGE
kuard-1128242161  1         1         1         13m

The Yaml file for the rolling update through deployment:

apiVersion: extensions/v1beta1
kind: Deployment
metadata:
  annotations:
    deployment.kubernetes.io/revision: "1"
  creationTimestamp: null
  generation: 1
  labels:
    run: kuard
  name: kuard
  selfLink: /apis/extensions/v1beta1/namespaces/default/deployments/kuard
spec:
  progressDeadlineSeconds: 2147483647
  replicas: 2
  revisionHistoryLimit: 10
  selector:
    matchLabels:
      run: kuard
  strategy:
    rollingUpdate:
      maxSurge: 1
      maxUnavailable: 1
    type: RollingUpdate
  template:
    metadata:
      creationTimestamp: null
      labels:
        run: kuard
    spec:
      containers:
      - image: gcr.io/kuar-demo/kuard-amd64:blue
        imagePullPolicy: IfNotPresent
        name: kuard
        resources: {}
        terminationMessagePath: /dev/termination-log
        terminationMessagePolicy: File
      dnsPolicy: ClusterFirst
      restartPolicy: Always
      schedulerName: default-scheduler
      securityContext: {}
      terminationGracePeriodSeconds: 30
status: {}

The Strategy object is defined the rollout option of the deployment. It has two ways to do this rollout task. 1) recreate 2) RollingUpdate

The deployment is using for two main purposes. 1) Scaling 2) Rolling update

Scaling:

We can edit the deployment yaml file updated the ReplicaSet as per your scaling. We can autoscaling easily without any downtime through deployment.

Rolling update or updated with Latest image:

We can edit the yaml file and updated the latest image of the application. It will rollout without any error/downtime through deployment.

P.S: Make sure to add the change cause annotation whenever your performing the rolling out of the application.

Monitoring the Rollout action:

# kubectl rollout status deployments deploymentname

Example:

$ kubectl rollout status deployments kuard
deployment kuard successfully rolled out

Rollout history:

#kubectl rollout history deployments deploymentname

Rollback the deployment to previous version incase of any issue with new release.

# kubectl rollout undo deployments deploymentname

$ kubectl rollout undo deployments kuard
deployment "kuard" rolled back

DameonSet:

DamonSet are used to deploying a system dameons such as log collectors and monitoring agents which typically run on each nodes. DamonSets are created by submitting a DemonSet configuration to the Kubernetes API server. 

The Yaml file for the DameonSet:

apiVersion: extensions/v1beta1
kind: DaemonSet
metadata:
  name: fluentd
  labels:
    app: fluentd
spec:
  template:
    metadata:
      labels:
        app: fluentd
    spec:
      containers:
      - name: fluentd
        image: fluent/fluentd:v0.14.10
        resources:
          limits:
            memory: 200Mi
          requests:
            cpu: 100m
            memory: 200Mi
        volumeMounts:
        - name: varlog
          mountPath: /var/log
        - name: varlibdockercontainers
          mountPath: /var/lib/docker/containers
          readOnly: true
      terminationGracePeriodSeconds: 30
      volumes:
      - name: varlog
        hostPath:
          path: /var/log
      - name: varlibdockercontainers
        hostPath:
          path: /var/lib/docker/containers

Node selectors can be limit what pods can run on given time in the K8S cluster. It will restrict the Pod creation on every node by using a DamonSet configuration. 


Kubernetes - ReplicaSet [part 8]

September 01, 2024 0


ReplicaSets:

ReplicaSet acts as cluster wide Pod manager and ensuring that right types & number of Pods are running at all times.  It is providing the underpinning of self-healing for our applications at the infrastructure level.

 The reconciliation loop is the notion of desire state versus observed or current state.  The reconciliation loop is constantly running, observing the current level of the Pods and taking action in case of different state.

The ReplicaSet controller will notice that a Pod is missing and create a new copy, but still Pod is still running is available to developers for interactive debugging rather than debugging from logs.

ReplicaSet is define in the spec section while create a configuration file.

apiVersion: extensions/v1beta1
kind: ReplicaSet
metadata:
  name: kuard
spec:
  replicas: 1
  template:
    metadata:
      labels:
        app: kuard
        version: "2"
    spec:
      containers:
        - name: kuard
          image: "gcr.io/kuar-demo/kuard-amd64:green"

ReplicaSet monitor cluster state using a set of Pod labels. Labels are used to filter Pod listings and track Pods running within a cluster.  

Scaling up the ReplicaSet thorough command:

#kubectl scale replicasets podname --replicas=4

The pods will be delete along with replica set when we have remove it. We need to set a --cascade flag to false if you want to retain the pods after delete a replica set.

#kubectl delete rs podname --cascade=false

Thursday, August 29, 2024

Kubernetes - Ingress [Part 7]

August 29, 2024 0


Ingress:

Kubernetes calls it HTTP based load balancing system Ingress. Ingress is a Kubernetes-native way to implement the "Virtual hosting" pattern.  The Kubernetes Ingress system works to simplify this by (a) standardizing that configuration (b) moving to standard Kubernetes object (c) merging multiple Ingress objects into a single config for the load balancer.

We have lot of Ingress controller in the market. I am going to use the contour [Ingress controller] along with Envoy load balancer.

Installed the contour as follows:

#kubectl apply -f https://j.hept.io/contour-deployment-rbac


We need to configure the DNS for the external address of loadbalancer, so that we can map lot of services into Load balancer and Ingress play a major rule to segregate the traffics and send to correspondent service.

The Yaml configuration for Ingress:

apiVersion: extensions/v1beta1
kind: Ingress
metadata:
  name: simple-ingress
spec:
  backend:
    serviceName: alpaca
    servicePort: 8080

Created a TLS:

#kubectl create secret tls <secret-name> --cert <certificate-pem-file> --key <private-key-pem-file>

The YAML file for the TLS:

apiVersion: v1

kind: Secret

metadata:

  creationTimestamp: null

  name: tls-secret-name

type: kubernetes.io/tls

data:

  tls.crt: <base64 encoded certificate>

  tls.key: <base64 encoded private key>

We can call the TLS certificate from Ingress file:

apiVersion: extensions/v1beta1

kind: Ingress

metadata:

  name: tls-ingress

spec:

  tls:

  - hosts:

    - alpaca.example.com

    secretName: tls-secret-name

  rules:

  - host: alpaca.example.com

    http:

      paths:

      - backend:

          serviceName: alpaca

          servicePort: 8080

P.S: It will tough to manage of all the TLS certificates with in K8S. The cert-manager is a API which will provide the certificate whenever the K8S request for it.

Ambassador and Gloo are two other Envoy based Ingress controller is available in the market. NGINX ingress controller is a most popular open source controller in the market.


Wednesday, August 28, 2024

Kubernetes - Services [Part 6]

August 28, 2024 0


 Labels & Annotation:

We can list the deployments along with labels:

#kubectl get deployments --show-labels

List the version with selector flag:

#kubectl get pods --selector="ver=2"

#kubectl get pods --selector="app in (test1,test2)"

Annotations provide a place to store additional metadata for the Kubernetes objects with the sole purpose of assisting tools and libraries. Labels are used to identify and group the objects whereas annotations are used to provide extra information about where an object came from, how to use it or policy around that object. Annotation used to track a rollout status and provide a necessary information require for rollback.

Annotation can be used to hold configuration data for the external tool such as third-party schedulers and configuration tools.


Services :

The DNS is a traditional system of service discovery on the Internet.

kubectl run is an easy way to create a deployment and kubectl expose is used to create a service.

ClusterIP:

A ClusterIP service is the default Kubernetes service. It gives you a service inside your cluster that other apps inside your cluster can access. There is no external access. This is a special IP address the system will load-balance across all of the Pods that are identified by the selector.

The YAML for a ClusterIP follow like this.

apiVersion: v1
kind: Service
metadata:
name: my-internal-service
spec:
selector:
app: my-app
type: ClusterIP
ports:
- name: http
port: 80
targetPort: 80
protocol: TCP

The customer request flow through as:

request -> proxy -> service -> Pod

Start the proxy to access the URL:

#kubectl proxy --port=8080

We can able to navigate this service as blow after enabled the proxy.

http://localhost:8080/api/v1/proxy/namespaces/default/services/my-internal-service:http/

P.S: We should not expose your service to the internet or any of production services.

NodePort:

A NodePort service is a most primitive way to get a external traffic directly to your service. NodePort as name implies open a specific port on all the nodes and traffic that sent to this port is forwarded to the service.


The Yaml file for NodePort setup as follows:

apiVersion: v1
kind: Service
metadata:
name: my-nodeport-service
spec:
selector:
app: my-app
type: NodePort
ports:
- name: http
port: 80
targetPort: 80
nodePort: 30036
protocol: TCP

The main difference between NodePort and ClusterIP is allocated additional port called the NodePort that specifies which port to open on all nodes, It will take a random port if we are not specific in the configuration file.

LoadBalancer:

A LoadBalancer is a standard way to expose your application to the internet. 


This is a default method if you want to expose directly to your service with safeway. All traffic on the port you specify will be forward to the service. but each service will get an own ip address while routing through loadbalancer. We have a to pay for the loadbalancer per exposed service.

Ingress:

It is not a type of service but it will act as smart router Infront of your application.

This will allow us to perform the path based and subdomain based routing into backend services.


The Yaml file for the Kubernetes object as follows:

apiVersion: extensions/v1beta1
kind: Ingress
metadata:
name: my-ingress
spec:
backend:
serviceName: other
servicePort: 8080
rules:
- host: foo.mydomain.com
http:
paths:
- backend:
serviceName: foo
servicePort: 8080
- host: mydomain.com
http:
paths:
- path: /bar/*
backend:
serviceName: bar
servicePort: 8080

Ingress is a most useful if you want to expose multiple services under the same IP address and all the services are use the same L7 protocol [http]. We can buy a single loadbalance and optimal use the services through Ingress with low cost.